
主题
Nginx安装及配置
目录
一. Nginx是什么?
Nginx (engine x) 是一个高性能的HTTP和反向代理web服务器,同时也提供了IMAP/POP3/SMTP服务。
Nginx是一款轻量级的Web服务器/反向代理服务器以及电子邮件代理服务器,并在一个BSD-like协议下发行。
二. Nginx特点、标签
并发能力强 负载均衡 反向代理 高效率web服务器 低内存消耗
并发能力强:nginx的并发能力确实在同类型的网页服务器中表现较好,nginx支持的并发连接上限取决于内存,10万远没封顶
负载均衡
负载均衡多在高并发情况下需要使用。
其原理就是将数据流量分摊到多个服务器执行,减轻每台服务器的压力,多台服务器(集群)共同完成工作任务,从而提高了数据的吞吐量。
反向代理
正向代理:正向代理即是客户端代理, 代理客户端, 服务端不知道实际发起请求的客户端.
反向代理:反向代理即是服务端代理, 代理服务端, 客户端不知道实际提供服务的服务端

高效率
在Linux操作系统下,nginx使用epoll事件模型,得益于此,nginx在Linux操作系统下效率相当高。同时Nginx在OpenBSD或FreeBSD操作系统上采用类似于Epoll的高效事件模型kqueue。
低内存消耗:一般情况下10000个非活跃的keep-alive连接仅消耗2.5M的内存
三. 安装Nginx
宿主机html默认目录:
/usr/local/nginx/html宿主机nginx.conf默认位置:/usr/local/nginx/conf/nginx.conf宿主机logs默认位置:/usr/local/nginx/logs宿主机nginx可执行文件默认位置:/usr/local/nginx/sbin/nginx,最后的nginx就是可执行文件
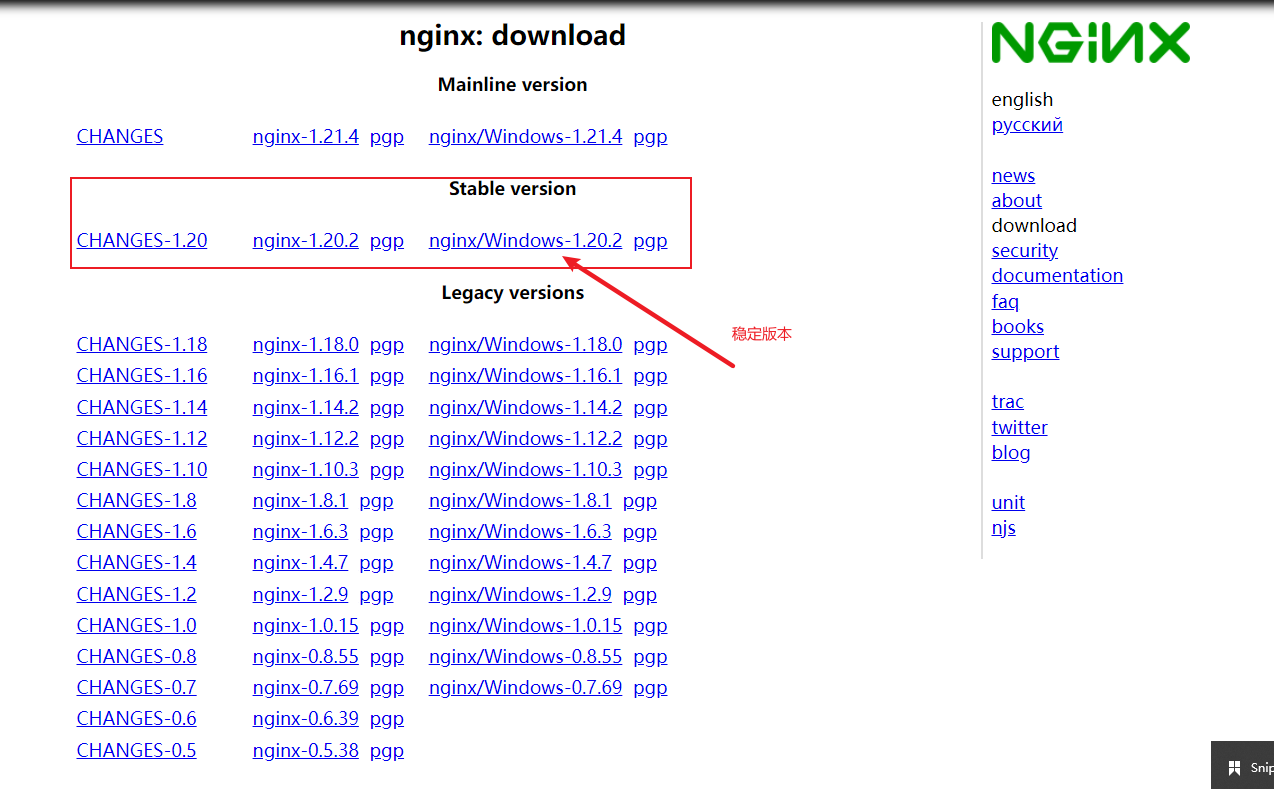
下载nginx
选择稳定版,
windows下直接下载,解压,配置,双击nginx.exe启动即可使用
Linux下安装Nginx
当前操作系统: CentOS 7.8 64位
前置条件
用xshell连接到云服务器
切换到默认目录, 默认目录为 /root,
cd /root
安装Nginx所需要环境
bash
# 1. gcc 安装 安装 nginx 需要先将官网下载的源码进行编译,编译依赖 gcc 环境, 中间有地方要先择,按 y 即可
$ yum install gcc-c++

#  2. PCRE pcre-devel 安装 PCRE(Perl Compatible Regular Expressions) 是一个Perl库,包括 perl 兼容的正则表达式库。nginx 的 http 模块使用 pcre 来解析正则表达式,所以需要在 linux 上安装 pcre 库,pcre-devel 是使用 pcre 开发的一个二次开发库。nginx也需要此库。
$ yum install -y pcre pcre-devel

# 3. zlib 安装 zlib 库提供了很多种压缩和解压缩的方式, nginx 使用 zlib 对 http 包的内容进行 gzip
$ yum install -y zlib zlib-devel

# 4. OpenSSL 安装 OpenSSL 是一个强大的安全套接字层密码库,囊括主要的密码算法、常用的密钥和证书封装管理功能及 SSL 协议,并提供丰富的应用程序供测试或其它目的使用。nginx 不仅支持 http 协议,还支持 https(即在ssl协议上传输http),所以需要在 Centos 安装 OpenSSL 库
$ yum install -y openssl openssl-devel
开始安装Nginx
- 使用wget命令下载nginx的源码包,并解压
bash
# 下载,当前下载的版本为1.15.5,也可以选择其他版本
$ wget http://nginx.org/download/nginx-1.15.5.tar.gz
# 查看文件
$ ll
# 解压(注意版本号)
$ tar -xf nginx-1.15.5.tar.gz
$ ll
# 进入解压的文件夹
$ cd nginx-1.15.5/
$ ls
# 可以看到解压出来如下文件及目录
auto CHANGES CHANGES.ru conf configure contrib html LICENSE man README src- 为了安全添加nginx用户和组,以便以后以nginx用户的身份运行nginx程序,而非root
bash
useradd nginx -s /sbin/nologin- 开始执行configure脚本,进行编译前的配置 #configure配置脚本有很多的参数
configure 常用参数如下
–prefix:安装目录
--user -group. 获取更多配置使用
--with-http_ssl_module 想要用https,必须添加该模块
--with-stream
bash
./configure --user=nginx --group=nginx --prefix=/usr/local/nginx --with-http_ssl_module --with-stream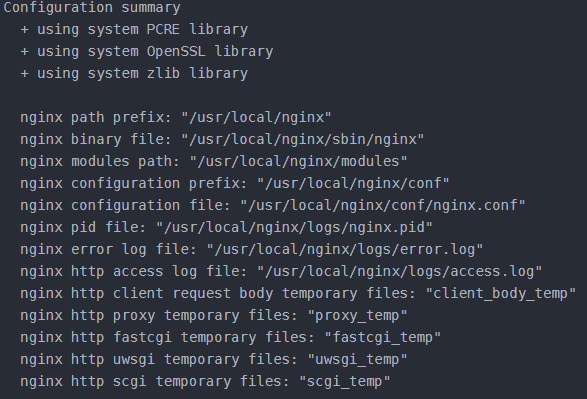 出现如上所示的输出. 表示configure配置成功
- 进行编译并复制文件到相应目录
bash
make && make install若不出现warning和error的一些信息, 表示成功
- 切换到安装目录,检查安装信息
bash
$ ls /usr/local/nginx/
# 输出 conf html logs sbin 表示nginx安装成功- 启动nginx进行访问测试
bash
# 切换到安装目录
$ cd /usr/local/nginx

# 启动nginx
$ ./sbin/nginx
#查看进程
$ netstat -nutlp | grep nginx
# 输出 tcp 0 0 0.0.0.0:80 0.0.0.0:* LISTEN 44202/nginx: master,表示启动成功- 内部访问nginx80端口, 查看到nginx进程正在监听80端口即为成功,下面进行curl访问测试,web页面也可以,更直观
bash
$ curl http://127.0.0.1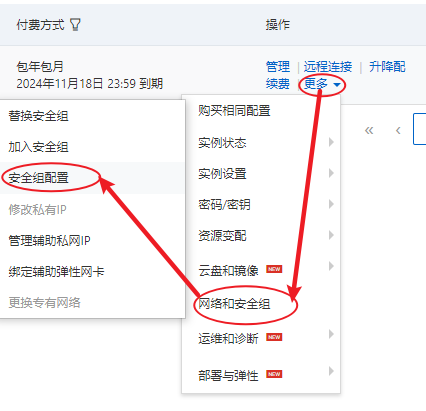
# 输出html字符串, 表示成功- 若到这一步用公网IP无法访问到云服务器nginx代理的端口, 可以检查服务器是否开放的此端口可被访问, 若没开放去开放相应端口即可. 例如阿里云的配置


四. Nginx常用命令
注意:如果想要这些命令生效,需要在nginx.exe所在目录下打开cmd进行执行,或者把此路径配置进入环境变量
bash
cd /usr/local/nginx/sbin/ # 先切换到nginx安装目录

./nginx -t     # 验证配置文件;无法验证其它文件的情况
./nginx -s reload   # 重新加载;可以重启其它文件启动的情况
./nginx -s stop   # 快速停止
./nginx -s quit   # 正常停止
./nginx -V     # 查看版本
./nginx -c conf/web01.conf # 使用另一个配置文件
启动时错误示例
bash
# 启动时报80端口被占用:
nginx: [emerg] bind() to 0.0.0.0:80 failed (98: Address already in use)
五. 卸载Nginx步骤
- 停止Nginx软件
bash
/usr/local/nginx/sbin/nginx -s stop注意: 如果不知道nginx安装路径,可以通过执行ps命令找到nginx程序的PID,然后kill其PID
- 查找根下所有名字包含nginx的文件
bash
find / -name nginx- 执行命令 rm -rf 文件路径 删除上一步查找出来的nignx安装的相关文件
bash
rm -rf /usr/local/sbin/nginx
rm -rf /usr/local/nginx
rm -rf /usr/src/nginx-1.11.1
rm -rf /var/spool/mail/nginx- 如果设置了Nginx开机自启动的话,可能还需要下面两步
bash
chkconfig nginx off
rm -rf /etc/init.d/nginx
删除之后,便可重新安装nginx了
六. Nginx使用
宿主机html默认目录:
/usr/local/nginx/html宿主机nginx.conf默认位置:/usr/local/nginx/conf/nginx.conf宿主机logs默认位置:/usr/local/nginx/logs宿主机nginx可执行文件默认位置:/usr/local/nginx/sbin/nginx,最后的nginx就是可执行文件
1. 部署前端项目
切换到nginx安装目录,(cd /usr/local/nginx) 可以看到有一个html目录,这个目录就是我们项目的网页代码所在的目录,我们的生产代码就应该放入到这里面来,或者将打包好的dist内容放到这个文件夹来。 重启Nginx即可完成web部署 示例: 1)我将vue打包好的dist文件夹放到/usr/local/nginx/html目录下,简单配置即可实现web静态文件的访问  2)nginx简单配置
 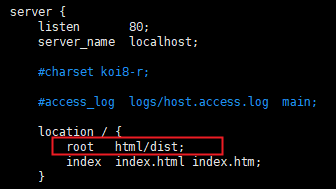 3)重启nginx:
  4)访问页面
注意: 访问页面可能会出现一些js、css、img等静态资源404,这是因为用webpack打包前端web时候,publicPath路径不对导致的,若打包时候的publicPath为/,那么将dist放到nginx的html目录时候,由于配置的root为html,那么访问页面时候,对于index.html来说,/就代表html目录,html目录下面只有dist文件夹。而没有js、css等静态资源,所以出现404
解决方法: 第一种:publicPath依然为/,将dist目录的内容直接放入html,root配置为html 第二中:将webpack中publicPath设置为linux中静态资源的绝对路径,例如:/html/dist,root依然为html; 但是注意,docker部署时候,一般都有容器到宿主机的映射目录,这时候,publicPath一般写这宿主机上映射的html目录下静态资源的绝对路径 第三种:打包时候将publicPath设置为相对路径./
2. 自定义nginx根目录
nginx配置文件内server节点下的每一个location节点,默认都会有一个root,表示根目录。值默认为html;表示根目录为html目录。若将前端打包好的文件夹dist直接放在nginx下的html文件夹内,那么在访问网站的时候,路径后就得加一层/dist, 例如http://fendou.host/dist, 才能访问到当前location代理的前端项目,若不想在路径上加上/dist,就得自定义root根目录为dist目录。只需要将html替换为html/dist,就能通过http://fendou.host直接访问到代理的前端项目了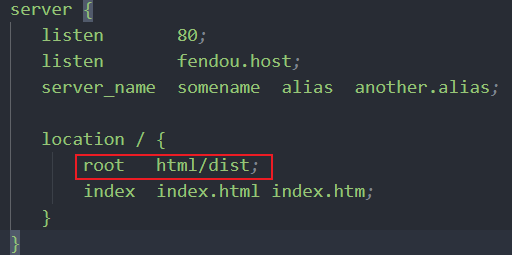
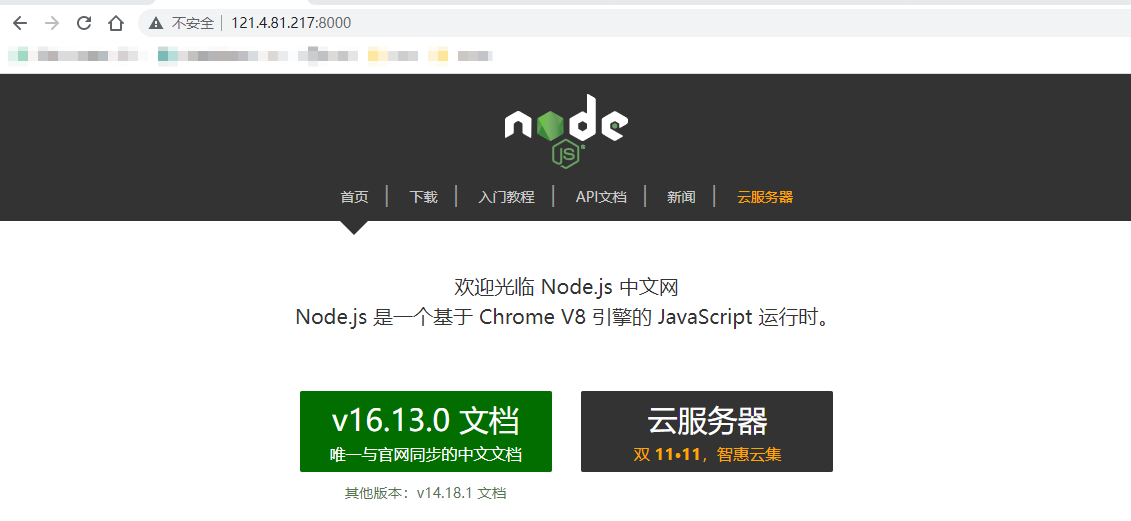
3. Nginx反向代理
当访问当前服务的8000端口时,会被代理到nodejs中文网。
bash
server {
    listen       8000;
    server_name  localhost;

    location / {
        proxy_pass http://nodejs.cn;
        proxy_set_header Host $host:$server_port;

        # Proxy Settings(可用配置项)

        # proxy_redirect off;
        # proxy_set_header Host www.163.com; # $host;不能使用$host变量
        # proxy_set_header X-Real-IP $remote_addr;
        # proxy_set_header X-Forwarded-For $proxy_add_x_forwarded_for;
        # proxy_next_upstream error timeout invalid_header http_500 http_502 http_503 http_504;
        # proxy_max_temp_file_size 0;
        # proxy_connect_timeout 90;
        # proxy_send_timeout 90;
        # proxy_read_timeout 90;
        # proxy_buffer_size 4k;
        # proxy_buffers 4 32k;
        # proxy_busy_buffers_size 64k;
        # proxy_temp_file_write_size 64k;
    }
}
4. Nginx使用https访问
上面代理的是http,也可以代理https,并用nginx配置安装域名的ssl证书。
在给域名开启https之前,首先得有一个ssl证书
申请ssl证书 腾讯云申请地址https://console.cloud.tencent.com/ssl 可以申请一个免费的ssl证书,免费证书有效期为一年。 ssl证书申请后,会提示待审核,若该域名首次申请ssl证书,需要等待的时间会相对久一些,否则很快,一两个小时内就会发放证书。
配置nginx,证书安装 成功后,将证书下载下来, 解压,解压出来的目录内会有一个Nginx目录
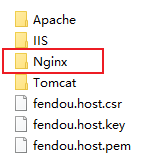 ,打开后,里面的文件就是配置https所需要的ssl。
将两个文件拷贝到服务器nginx安装目录下,可以新建文件夹保存。
打开nginx配置文件,在代理https的server下填入证书(安装证书)。 在操作前先把nginx.conf文件备份下,以免出错后无法恢复
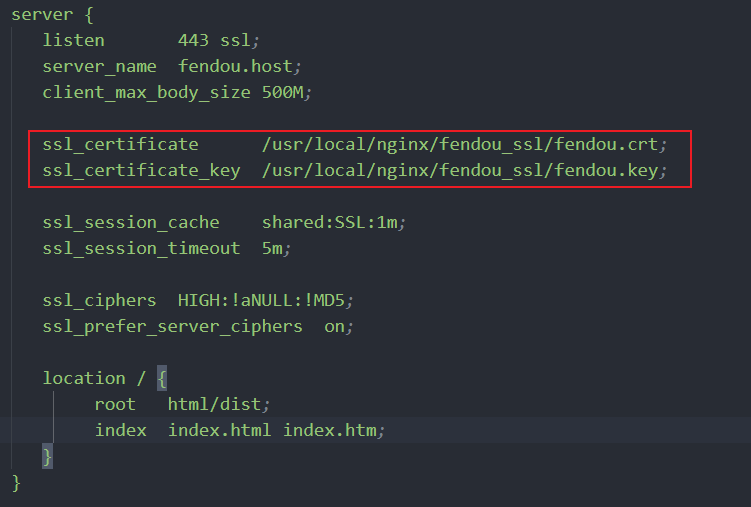
重启Nginx(/usr/local/nginx/sbin/nginx -s reload ),用https://fendou.host 访问
5. http 重定向到 https
当https配置好后,原本的http访问依然可以访问到站点,若不想保留使用http,在用户访问http时,自动重定向到https,解决方法如下:
bash
server {
    listen 80;
    server_name fendou.host www.fendou.host;
    return 301 https://fendou.host$request_uri; # 将流量移至该站点的HTTPS版本 $request_uri变量用于完整的原始请求URI,其中也包含参数。
}
6. location 后规则
语法规则:
location [=|~|~*|^~] /url/ {
 ...
}
规则详解:
=开头表示精确匹配~开头标签hi区分大小写的正则~*开头表示不区分大小写的正则匹配^~开头表示url以某个常规字符串开头,理解为匹配 url路径即可。nginx不对url做编码,因此请求为/static/20%/aa,可以被规则^~ /static/ /aa匹配到(注意是空格)!~和!~*分别为区分大小写不匹配 及 不区分大小写不匹配 的正则/通用匹配,任何请求都会匹配到
匹配优先级:
当同一个server块里面同时存在多个location规则,nginx匹配url存在优先级
- 首先精确匹配(=) --> 其次以xx开头匹配(^~)--> 然后是按文件中顺序的正则匹配 --> 最后是交给 / 通用匹配。
- 当有匹配成功时候,停止匹配,按当前匹配规则处理请求。
7. 开启 gzip 压缩
GZIP是网站压缩加速的一种技术,对于开启后可以加快我们网站的打开速度,原理是经过服务器压缩,客户端浏览器快速解压的原理,可以大大减少了网站的流量
bash
    # gzip 对图片或者视频压缩效果不好,建议只对html, css, js, xml 等文件压缩

    gzip  on;               # 开启gzip压缩 默认off, 注释即为off
    gzip_comp_level 3;      # 压缩级别 1-9 ,值越大压得越小,也越耗CPU,压缩时间越长
    gzip_min_length 1024;   # 达到1kb及以上的资源才进行压缩, 1k以下可能会存在越压越大的情况
    gzip_disable "MSIE [1-6]\."; #配置禁用gzip条件,支持正则。此处表示ie6及以下不启用gzip(因为ie低版本不支持)
    gzip_vary on;           # http头联合使用,加个vary头,给代理服务器用的,有的浏览器支持压缩,有的不支持,所以避免浪费不支持的也压缩,所以根据客户端的HTTP头来判断,是否需要压缩
    gzip_http_version 1.1 ; # 默认值: 1.1,标识只有http协议是1.1版本的才会开启压缩,因为早期浏览器可能存在不支持自解压功能,会存在用户看到乱码的风险
    gzip_buffers 4 16k;     #设置系统获取几个单位的缓存用于存储gzip的压缩结果数据流
gzip_types application/javascript text/css text/xml; # 仅对这些类型文件进行压缩,默认 text/html,更多格式可在文件 /usr/local/nginx/conf/mime.types内查看mime.types文件所在路径: /usr/local/nginx/conf/mime.types (nginx安装目录下的conf/mime.types)
8. 配置隐藏nginx版本号
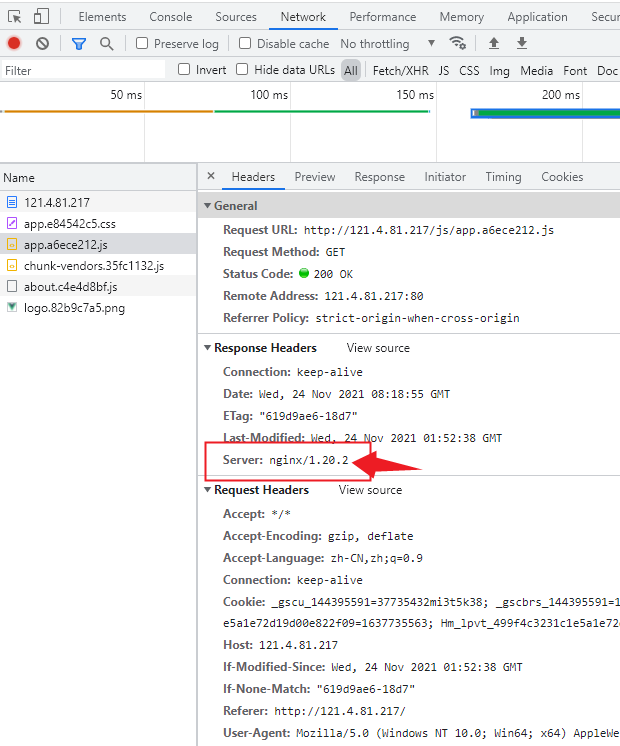
 只需要再http块下添加一行代码 server_tokens off;
9. 解决前端history路由报错
前端路由有两种模式:hash和history,vue使用hash模式较多,react使用history模式较多,hash与history外观上面的区别,就是hash在访问页面时,url上面会多出一个
#,例如:http://localhost:8080/#/bank/page/,而history模式路由与正常的url一样无区别,美观上更胜一筹,但是history路由需要后台配置的支持,否则,刷新页面可能会出现找不到页面的报错,具体如下:
当我们进行项目的主页的时候,一切正常,可以访问,但是当我们刷新页面或者直接访问路径的时候就会返回404,那是因为在history模式下,只是动态的通过js操作window.history来改变浏览器地址栏里的路径,并没有发起http请求,但是当我直接在浏览器里输入这个地址的时候,就一定要对服务器发起http请求,但是这个目标在服务器上又不存在,所以会返回404,怎么解决呢?我们现在可以把所有请求都转发到 http://localhost:8080/index.html上就可以了。
nginx配置,很简单,只用加上一行代码:try_files $uri $uri/ /index.html;
bash
location / {
    # index.html文件在服务器中的存储目录
    root /data/www;  # /data/www需要修改为你服务器中的目录
    index index.html index.htm;

    #资源访问失败后定向到index.html
    try_files $uri $uri/ /index.html;
}

location /bank/page/ {
    try_files $uri $uri/ /bank;
},
/* http://aa.xx.com/bank2/page/count 有多个不同的地址 就加一个如下这个配置 */
location /bank2/page/ {
    try_files $uri $uri/ /bank2;
}
其作用是按顺序检查文件是否存在,返回第一个找到的文件或文件夹(结尾加斜线表示为文件夹),如果所有的文件或文件夹都找不到,会进行一个内部重定向到最后一个参数。 例如: try_files $uri $uri/ /index.html:访问一个路由,首先将这个路由当作file访问($uri),找不到资源时候,会将路由名称作为文件夹来找($uri/),若还是找不到,就访问(重定向)最后一个(/index.html)
需要注意的是,只有最后一个参数可以引起一个内部重定向,之前的参数只设置内部URI的指向。最后一个参数是回退URI且必须存在,否则会出现内部500错误。命名的location也可以使用在最后一个参数中。与rewrite指令不同,如果回退URI不是命名的location那么args不会自动保留,如果你想保留args,则必须明确声明。
七. nginx配置文件
当安装成功Nginx后, 配置文件存放于 /usr/local/nginx/conf/nginx.conf 文件内, windows下存放于 nginx/conf/nginx.conf 文件内
在 nginx.conf 内的注释符号为: #
配置文件结构
bash
##### 每个指令必须有分号结束。######
#user administrator administrators;    #配置用户或者组,默认为nobody nobody。
#worker_processes 2;        #允许生成的进程数,默认为1, 一般等于cpu数量或为2倍cpu数量
#pid /nginx/pid/nginx.pid;       #指定nginx进程运行文件存放地址
error_log log/error.log debug;     #制定日志路径,级别。这个设置可以放入全局块,http块,server块,级别以此为:debug|info|notice|warn|error|crit|alert|emerg
events {
    accept_mutex on;         #设置网路连接序列化,防止惊群现象发生,默认为on
    # 惊群现象: 一个网路连接到来,多个睡眠的进程被同时叫醒,但只有一个进程能获得链接,这样会影响系统性能
    multi_accept on;        #设置一个进程是否同时接受多个网络连接,默认为off
    #use epoll;            #事件驱动模型,select|poll|kqueue|epoll|resig|/dev/poll|eventport
    worker_connections  1024;       #最大连接数,默认为512
}
http {
    include       mime.types;      #文件扩展名与文件类型映射表
    default_type  application/octet-stream; #默认文件类型,默认为text/plain
    #access_log off;       #取消服务日志
    log_format myFormat '$remote_addr–$remote_user [$time_local] $request $status $body_bytes_sent $http_referer $http_user_agent $http_x_forwarded_for';  #自定义格式
    access_log log/access.log myFormat;   #combined为日志格式的默认值
    sendfile on;          #允许sendfile方式传输文件,默认为off,可以在http块,server块,location块。
    sendfile_max_chunk 100k;      #每个进程每次调用传输数量不能大于设定的值,默认为0,即不设上限。
    keepalive_timeout 65;       #连接超时时间,默认为75s,可以在http,server,location块。

    upstream mysvr {
      server 127.0.0.1:7878;
      server 192.168.10.121:3333 backup;   #热备
    }
    error_page 404 https://www.baidu.com;  #错误页
    server {
        keepalive_requests 120;    #单连接请求上限次数。
        listen       4545;       #监听端口
        server_name  127.0.0.1;      #监听地址
        location  ~*^.+$ {          #请求的url过滤,正则匹配,~为区分大小写,~*为不区分大小写。
           #root path;       #根目录
           #index vv.txt;       #设置默认页
           proxy_pass  http://mysvr;    #请求转向mysvr 定义的服务器列表
           deny 127.0.0.1;      #拒绝的ip
           allow 172.18.5.54;     #允许的ip
        }
    }
}- 1、全局块:配置影响nginx全局的指令。一般有运行nginx服务器的用户组,nginx进程pid存放路径,日志存放路径,配置文件引入,允许生成worker process数等。
- 2、events块:配置影响nginx服务器或与用户的网络连接。有每个进程的最大连接数,选取哪种事件驱动模型处理连接请求,是否允许同时接受多个网路连接,开启多个网络连接序列化等。
- 3、http块:可以嵌套多个server,配置代理,缓存,日志定义等绝大多数功能和第三方模块的配置。如文件引入,mime-type定义,日志自定义,是否使用sendfile传输文件,连接超时时间,单连接请求数等。
- 4、server块:配置虚拟主机的相关参数,一个http中可以有多个server。
- 5、location块:配置请求的路由,以及各种页面的处理情况。
1、几个常见配置项:
- 1.$remote_addr 与 $http_x_forwarded_for 用以记录客户端的ip地址;
- 2.$remote_user :用来记录客户端用户名称;
- 3.$time_local : 用来记录访问时间与时区;
- 4.$request : 用来记录请求的url与http协议;
- 5.$status : 用来记录请求状态;成功是200;
- 6.$body_bytes_s ent :记录发送给客户端文件主体内容大小;
- 7.$http_referer :用来记录从那个页面链接访问过来的;
- 8.$http_user_agent :记录客户端浏览器的相关信息;
八. 完整参考配置(同时代理http/https,ws/ws)
转自博客
bash
#user nobody;
worker_processes 1;
#error_log logs/error.log;
#error_log logs/error.log notice;
#error_log logs/error.log info;
#pid logs/nginx.pid;
events {
    worker_connections 1024;
}
# # websocket 7015
# stream {
# upstream abc {
# server 127.0.0.1:8001;
# }
# server {
# listen 7015;
# proxy_pass abc;
# }
# }
http {
    # #升级到 wss
    # map $http_upgrade $connection_upgrade {
    # default upgrade;
    # '' close;
    # }
    include mime.types;
    default_type application/octet-stream;
    #log_format main '$remote_addr - $remote_user [$time_local] "$request" '
    # '$status $body_bytes_sent "$http_referer" '
    # '"$http_user_agent" "$http_x_forwarded_for"';
    #access_log logs/access.log main;
    sendfile on;
    #tcp_nopush on;
    #keepalive_timeout 0;
    keepalive_timeout 65;
    #gzip on;
    # HTTP server 7013
    server {
        listen 7013;
        server_name localhost;
        #charset koi8-r;
        #access_log logs/host.access.log main;
        location / {
            root html;
            proxy_pass http://127.0.0.1:8000;
            # proxy_pass http://blogzl.com:7012;
            index index.html index.htm;
        }
        # 等价于使用 /proxy 代替真实地址 http://www.blogzl.com:7012;
        location /proxy {
            rewrite ^.+proxy/?(.*)$ /$1 break;
            include uwsgi_params;
            proxy_pass http://www.blogzl.com:7012;
        }
        #error_page 404 /404.html;
        # redirect server error pages to the static page /50x.html
        #
        error_page 500 502 503 504 /50x.html;
        location = /50x.html {
            root html;
        }
        # proxy the PHP scripts to Apache listening on 127.0.0.1:80
        #
        #location ~ \.php$ {
        # proxy_pass http://127.0.0.1;
        #}
        # pass the PHP scripts to FastCGI server listening on 127.0.0.1:9000
        #
        #location ~ \.php$ {
        # root html;
        # fastcgi_pass 127.0.0.1:9000;
        # fastcgi_index index.php;
        # fastcgi_param SCRIPT_FILENAME /scripts$fastcgi_script_name;
        # include fastcgi_params;
        #}
        # deny access to .htaccess files, if Apache's document root
        # concurs with nginx's one
        #
        #location ~ /\.ht {
        # deny all;
        #}
    }
    # HTTP server 80
    server {
        listen 80;
        server_name localhost;
        #charset koi8-r;
        #access_log logs/host.access.log main;
        location / {
            root html;
            # proxy_pass http://127.0.0.1:8080;
            # proxy_pass https://blogzl.com;
            index index.html index.htm;
        }
        #websocket 代理 (页面请求 wss://)
        location /websocket {
            # 转接路径后台对应的ws路径(换成 http )
            # 如:ws://127.0.0.1:23001/websocket (如果是 https 则是转发到 wss,即代理时都写为http/https 去代理ws/wss)
            proxy_pass http://127.0.0.1:8001/;
            proxy_http_version 1.1;
            proxy_set_header Upgrade $http_upgrade;
            proxy_set_header Connection "upgrade";
        }
        # 等价于使用 /proxy 代替真实地址 http://www.blogzl.com:7012;
        location /databaseURL {
            rewrite ^.+databaseURL/?(.*)$ /$1 break;
            include uwsgi_params;
            proxy_pass https://vscode-live-12eb9-default-rtdb.asia-southeast1.firebasedatabase.app;
        }
        #error_page 404 /404.html;
        # redirect server error pages to the static page /50x.html
        #
        error_page 500 502 503 504 /50x.html;
        location = /50x.html {
            root html;
        }
        # proxy the PHP scripts to Apache listening on 127.0.0.1:80
        #
        #location ~ \.php$ {
        # proxy_pass http://127.0.0.1;
        #}
        # pass the PHP scripts to FastCGI server listening on 127.0.0.1:9000
        #
        #location ~ \.php$ {
        # root html;
        # fastcgi_pass 127.0.0.1:9000;
        # fastcgi_index index.php;
        # fastcgi_param SCRIPT_FILENAME /scripts$fastcgi_script_name;
        # include fastcgi_params;
        #}
        # deny access to .htaccess files, if Apache's document root
        # concurs with nginx's one
        #
        #location ~ /\.ht {
        # deny all;
        #}
    }
    # another virtual host using mix of IP-, name-, and port-based configuration
    #
    #server {
    # listen 8000;
    # listen somename:8080;
    # server_name somename alias another.alias;
    # location / {
    # root html;
    # index index.html index.htm;
    # }
    #}
    # HTTPS server 443
    server {
        listen 443 ssl;
        server_name localhost;
        ssl_certificate /Users/zhanglu/Desktop/ssl/server.crt;
        ssl_certificate_key /Users/zhanglu/Desktop/ssl/server.key;
        ssl_session_cache shared:SSL:1m;
        ssl_session_timeout 5m;
        ssl_ciphers HIGH:!aNULL:!MD5;
        ssl_prefer_server_ciphers on;
        #websocket 代理 (页面请求 wss://)
        location /websocket {
            # 如果路径后面跟了查询参数,那么就需要这样重写下路径
            rewrite ^.+websocket/?(.*)$ /$1 break;
            include uwsgi_params;
            # 转接路径后台 ws 路径(换成 http )
            proxy_pass http://127.0.0.1:8001;
            # ws://127.0.0.1:23001/websocket (如果是 https 则是转发到 wss)
            proxy_http_version 1.1;
            proxy_set_header Upgrade $http_upgrade;
            proxy_set_header Connection "upgrade";
        }
        location / {
            root html;
            index index.html index.htm;
        }
    }
    include servers/*;
}
九. Nginx进阶使用
1、负载均衡配置
负载均衡的目的是为了解决单个节点压力过大,造成Web服务响应过慢,严重的情况下导致服务瘫痪,无法正常提供服务。 通常一个访问量非常大的Web网站(比如:淘宝、京东、12306等),由于一个Web服务同时能处理的用户并发请求的数量有限,同时还有机器故障的情况,所以一个Web站点通常会在N台机器上各部署一套同样的程序。当某一个服务挂掉的时候,还有第二个、第三个、第N个服务。。。继续为用户提供服务,给用户的感觉,你的服务还在正常的运行!
内置负载策略
Nginx负载均衡是通过upstream模块来实现的,内置实现了三种负载策略,配置还是比较简单的:
- ①、轮循(默认) Nginx根据请求次数,将每个请求均匀分配到每台服务器
- ②、最少连接 将请求分配给连接数最少的服务器。Nginx会统计哪些服务器的连接数最少。
- ③、IP Hash 绑定处理请求的服务器。第一次请求时,根据该客户端的IP算出一个HASH值,将请求分配到集群中的某一台服务器上。后面该客户端的所有请求,都将通过HASH算法,找到之前处理这台客户端请求的服务器,然后将请求交给它来处理。
Nginx使用upstream声明用于负载均衡的多个服务端地址(即在多个机器或者一个机器多个端口上同时启动一样的服务),upstream选项与server同级 例如:
bash
http {

    # ... 省略其它配置

    upstream blog_serve{
        server 192.168.0.100:8080;
        server 192.168.0.101:8080;
        server example.com:8080;
    }

    server {
        listen 80;

        location / {
            proxy_pass http://blog_serve;
        }
    }

    # ... 省略其它配置
}
其中:
- upstream模块:配置反向代理服务器组,Nginx会根据配置,将请求分发给组里的某一台服务器。
blog_serve就是服务器组的名称 - proxy_pass http://blog_serve; :表示将所有请求转发到blog_serve服务器组中配置的某一台服务器上
- upstream模块下的
server指令:配置处理请求的服务器IP或域名,端口可选,不配置默认使用80端口。
通过上面的配置,Nginx默认将请求依次分配给100,101,102来处理,可以通过修改下面这些参数来改变默认的分配策略:
weight (默认为1)
weight表示权重,可以根据机器配置定义权重。(默认为1,将请求平均分配给每台server),权值越高被分配到的比例越大
例如:
bash
upstream blog_serve {
    server 192.168.0.100:8080 weight=2;  # 2/6次
    server 192.168.0.101:8080 weight=3;  # 3/6次
    server 192.168.0.102:8080 weight=1;  # 1/6次
}
当weight不指定时,各服务器weight相同,默认都为1,为普通轮询 每个请求按时间顺序逐一分配到不同的后端服务器,如果后端服务器down掉,能自动剔除
max_fails (默认为1)
某台Server允许请求失败的次数,超过最大次数后,在fail_timeout时间内,新的请求将不会分配给这台机器。 如果设置为0,Nginx会将这台Server置为永久无效状态,然后将请求发给定义了proxy_next_upstream, fastcgi_next_upstream, uwsgi_next_upstream, scgi_next_upstream, memcached_next_upstream指令来处理这次错误的请求。
fail_timeout (默认为10秒)
某台Server达到max_fails次失败请求后,在fail_timeout期间内,nginx会认为这台Server暂时不可用,不会将请求分配给它.
例如:
bash
upstream blog_serve {
     # 192.168.0.100:8080 如果有3次请求失败,nginx在15秒内,不会将新的请求分配给它。
    server 192.168.0.100:8080 weight=2 max_fails=3 fail_timeout=15;
    server 192.168.0.101:8080 weight=3;
    server 192.168.0.102:8080 weight=1;
}
keepalive
如果后端服务器down掉,一般能自动剔除,但是azure虚拟机上有时候会出现不自动剔除的现象,但是azure虚拟机上有时候会出现不自动剔除的现象,所以最好带上keepalive 30;参数,即30秒节点没响应即可剔除
例如:
bash
upstream blog_serve {
     # 192.168.0.100:8080 如果有3次请求失败,nginx在15秒内,不会将新的请求分配给它。
    server 192.168.0.100:8080 weight=2 max_fails=3 fail_timeout=15;
    server 192.168.0.101:8080 weight=3;
    server 192.168.0.102:8080 weight=1;
    keepalive 30;
}
ip_hash
加入ip_hash;,让同一个用户落到同一台机器上
例如:
bash
upstream blog_serve {
     ip_hash;
     # 192.168.0.100:8080 如果有3次请求失败,nginx在15秒内,不会将新的请求分配给它。
    server 192.168.0.100:8080 weight=2 max_fails=3 fail_timeout=15;
    server 192.168.0.101:8080 weight=3;
    server 192.168.0.102:8080 weight=1;
    keepalive 30;
}
backup (备份机)
备份机,只有当所有服务器挂了之后才会生效,否则不生效。
例如:
bash
upstream blog_serve {
     ip_hash;
     # 192.168.0.100:8080 如果有3次请求失败,nginx在15秒内,不会将新的请求分配给它。
    server 192.168.0.100:8080 weight=2 max_fails=3 fail_timeout=15;
    server 192.168.0.101:8080 weight=3;
    server 192.168.0.102:8080 weight=1;

    server 192.168.0.103:8080 backup; # 备份机
    keepalive 30;
}
down
标识某一台server不可用。可能能通过某些参数动态的激活它吧,要不真没啥用。
例如:
bash
upstream blog_serve {
     ip_hash;
     # 192.168.0.100:8080 如果有3次请求失败,nginx在15秒内,不会将新的请求分配给它。
    server 192.168.0.100:8080 weight=2 max_fails=3 fail_timeout=15;
    server 192.168.0.101:8080 weight=3;
    server 192.168.0.102:8080 weight=1;
    server 192.168.0.102:3000 down; #表示这台Server为无效状态,不会将请求分配给它

    server 192.168.0.103:8080 backup; # 备份机
    keepalive 30;
}
max_conns (默认0)1.5.9之后的版本才有
限制分配给某台Server处理的最大连接数量,超过这个数量,将不会分配新的连接给它。默认为0,表示不限制。注意:1.5.9之后的版本才有这个配置
例如:
bash
upstream blog_serve  {
    server 192.168.0.100:8080 max_conns=1000;
    server 192.168.0.100:3000;
}
表示最多给192.168.0.100:8080 这台Server分配1000个请求,如果这台Server正在处理1000个请求,nginx将不会分配新的请求给到它。 假如有一个请求处理完了,还剩下999个请求在处理,这时nginx也会将新的请求分配给它。
resolve
将server指令配置的域名,指定域名解析服务器。需要在http模块下配置resolver指令,指定域名解析服务
例如:
bash
http {
    resolver 10.0.0.1;
    # ... 省略其它配置

    upstream blog_serve{
        server 192.168.0.100:8080;
        server 192.168.0.101:8080;
        server example.com resolve; # 表示example.com域名,由10.0.0.1服务器来负责解析。
    }

    server {
        listen 80;

        location / {
            proxy_pass http://blog_serve;
        }
    }

    # ... 省略其它配置
}
fair (需要第三方插件)
按后端服务器的响应时间来分配请求,响应时间短的优先分配。
例如
bash
upstream blog_serve {
     # 192.168.0.100:8080 如果有3次请求失败,nginx在15秒内,不会将新的请求分配给它。
    server 192.168.0.100:8080 weight=2 max_fails=3 fail_timeout=15;
    server 192.168.0.101:8080 weight=3;
    server 192.168.0.102:8080 weight=1;
    keepalive 30;
    fair;
}
url_hash (需要第三方插件)
按访问url的hash结果来分配请求,使每个url定向到同一个后端服务器,后端服务器为缓存服务器时比较有效。 在upstream中加入hash语句,hash_method是使用的hash算法
例如
bash
upstream blog_serve {
     # 192.168.0.100:8080 如果有3次请求失败,nginx在15秒内,不会将新的请求分配给它。
    server 192.168.0.100:8080 weight=2 max_fails=3 fail_timeout=15;
    server 192.168.0.101:8080 weight=3;
    server 192.168.0.102:8080 weight=1;
    keepalive 30;

    hash $request_uri;
    hash_method crc32;
}
2、nginx缓存配置
nginx配置缓存的优点:可以在一定程度上,减少服务器的处理请求压力。比如对一些图片,css或js做一些缓存,那么在每次刷新浏览器的时候,就不会重新请求了,而是从缓存里面读取。这样就可以减轻服务器的压力。
nginx可配置的缓存又有2种: 1)客户端的缓存(一般指浏览器的缓存)。 2)服务端的缓存(使用proxy-cache实现的)。
客户端的缓存一般有如下两种方式实现:协商缓存和强缓存。
协商缓存: 浏览器第一次发出请求一个资源`的时候,服务器会返回一个last-Modify到hearer中. Last-Modify 含义是最后的修改时间。 当浏览器再次请求的时候,request的请求头会加上 if-Modify-Since,该值为缓存之前返回的 Last-Modify. 服务器收到if-Modify-Since后,根据资源的最后修改时间(last-Modify)和该值(if-Modify-Since)进行比较,如果相等的话,则命中缓存,返回304,否则, 如果 Last-Modify > if-Modify-Since, 则会给出200响应,并且更新Last-Modify为新的值。
强缓存: 浏览器在加载资源的时候,会先根据本地缓存资源的header中的信息(Expires 和 Cache-Control)来判断是否需要强制缓存。如果命中的话,则会直接使用缓存中的资源。否则的话,会继续向服务器发送请求。
协商缓存和强缓存,参考文章:《理解http浏览器的协商缓存和强制缓存》
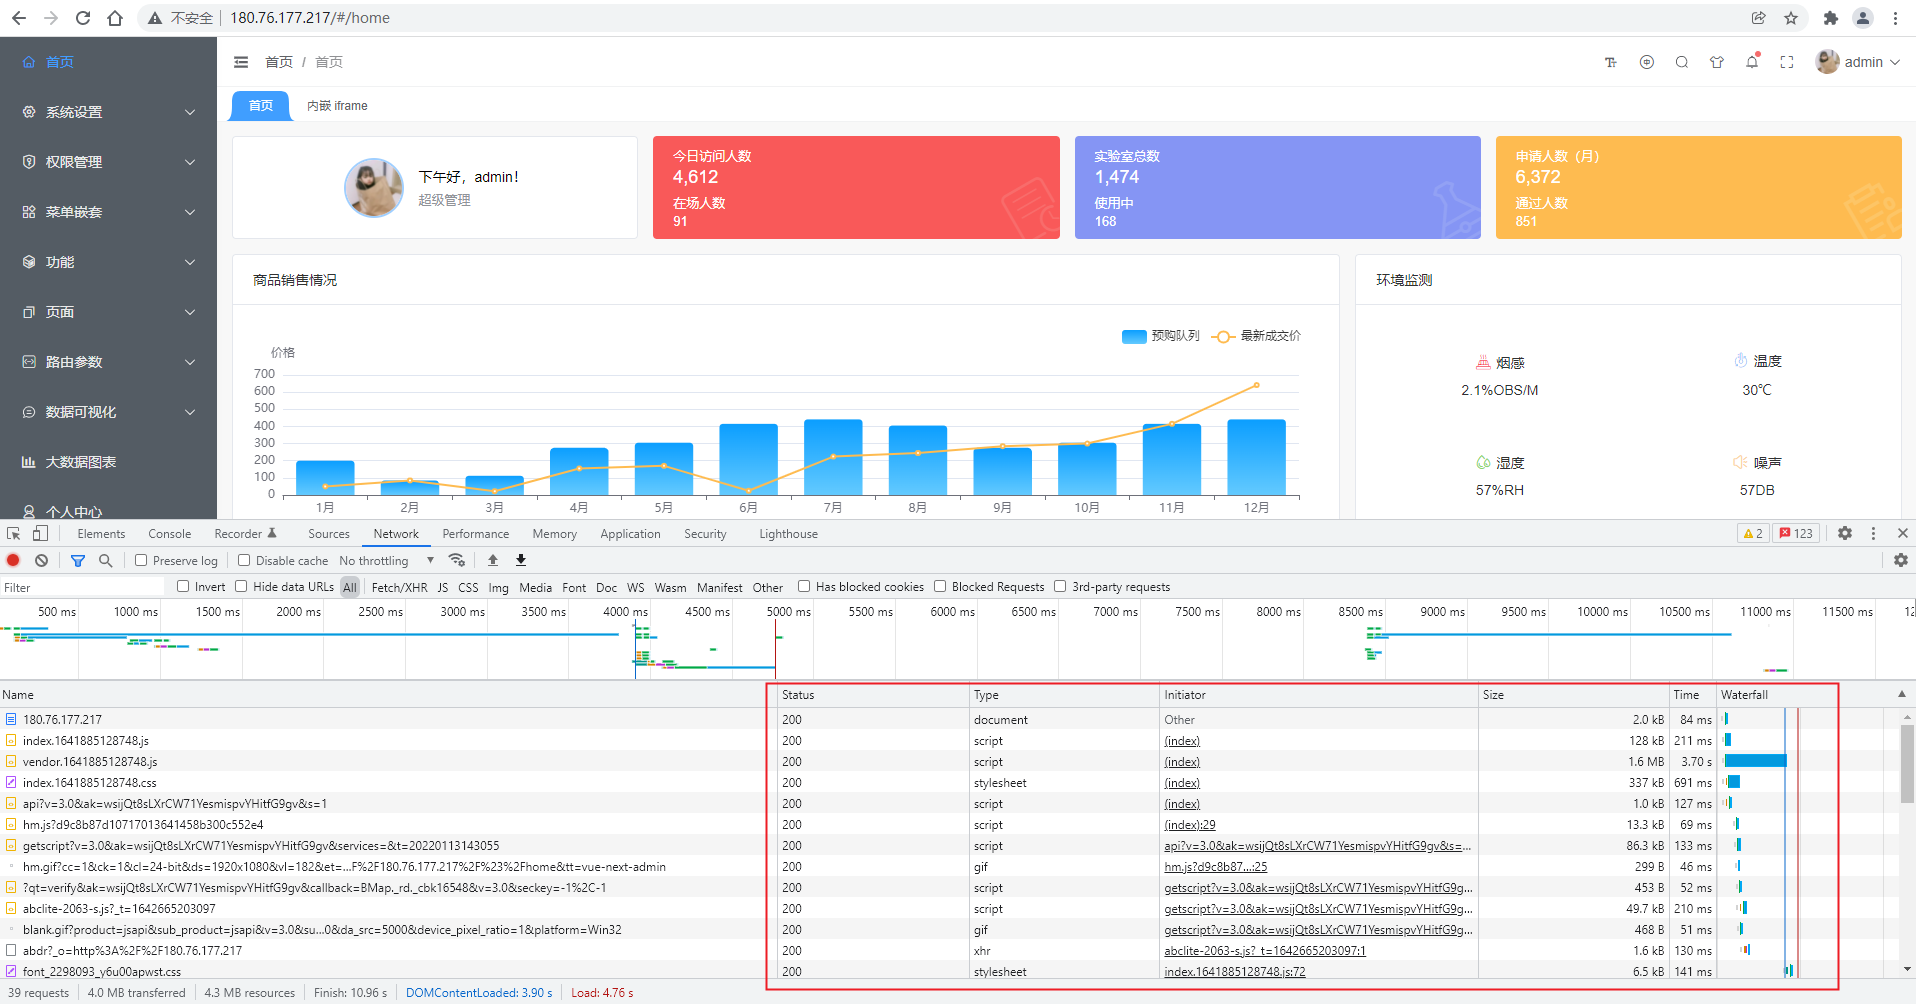
1. 没配置缓存时
当我们在nginx没有配置任何的时候,我们在浏览器访问网页时候,可以看到不管我刷新多少次,浏览器下图片,css,js所有的请求都会返回200,不会有任何缓存。
2. 缓存nginx上的静态资源(非代理)
打开nginx配置文件,由于nginx是docker部署的,且配置文件在宿主机服务器做了映射挂载, 所以,要修改nginx容器的配置文件,只需要修改宿主机映射的文件即可,具体查看《Docker部署项目----示例》中第二章节“docker-nginx部署前端项目” 这里nginx配置文件映射的宿主机目录为:/home/www/nginx/conf/conf.d/,所以只需要修改下面的default.conf配置文件即可,配置如下:
efault.conf文件加入配置
bash
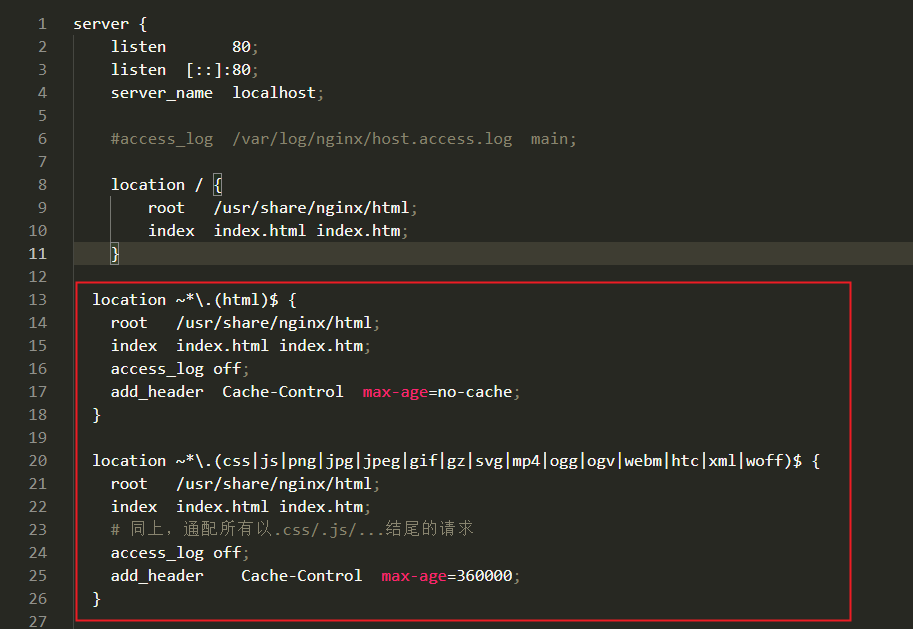
  location ~*\.(html)$ {
    root   /usr/share/nginx/html;
    index  index.html index.htm;
    access_log off;
    add_header  Cache-Control  max-age=0, no-cache;
  }

  location ~*\.(css|js|png|jpg|jpeg|gif|gz|svg|mp4|ogg|ogv|webm|htc|xml|woff)$ {
    root   /usr/share/nginx/html;
    index  index.html index.htm;
    # 同上,通配所有以.css/.js/...结尾的请求
    access_log off;
    add_header    Cache-Control  max-age=360000;
  }
如上配置解析含义如下:
~* 的含义是:通配任意字符(且大小写不敏感),\转义字符,因此 ~* \.(html)$的含义是:匹配所有以.html结尾的请求 access_log off 的含义是 关闭日志功能。 add_header Cache-Control max-age=0, no-cache;的含义:html文件不设置强制缓存时间,协商缓存,使用 Last-Modified。no-cache 会发起往返通信来验证缓存的响应,但如果资源未发生变化,则不会下载,返回304。 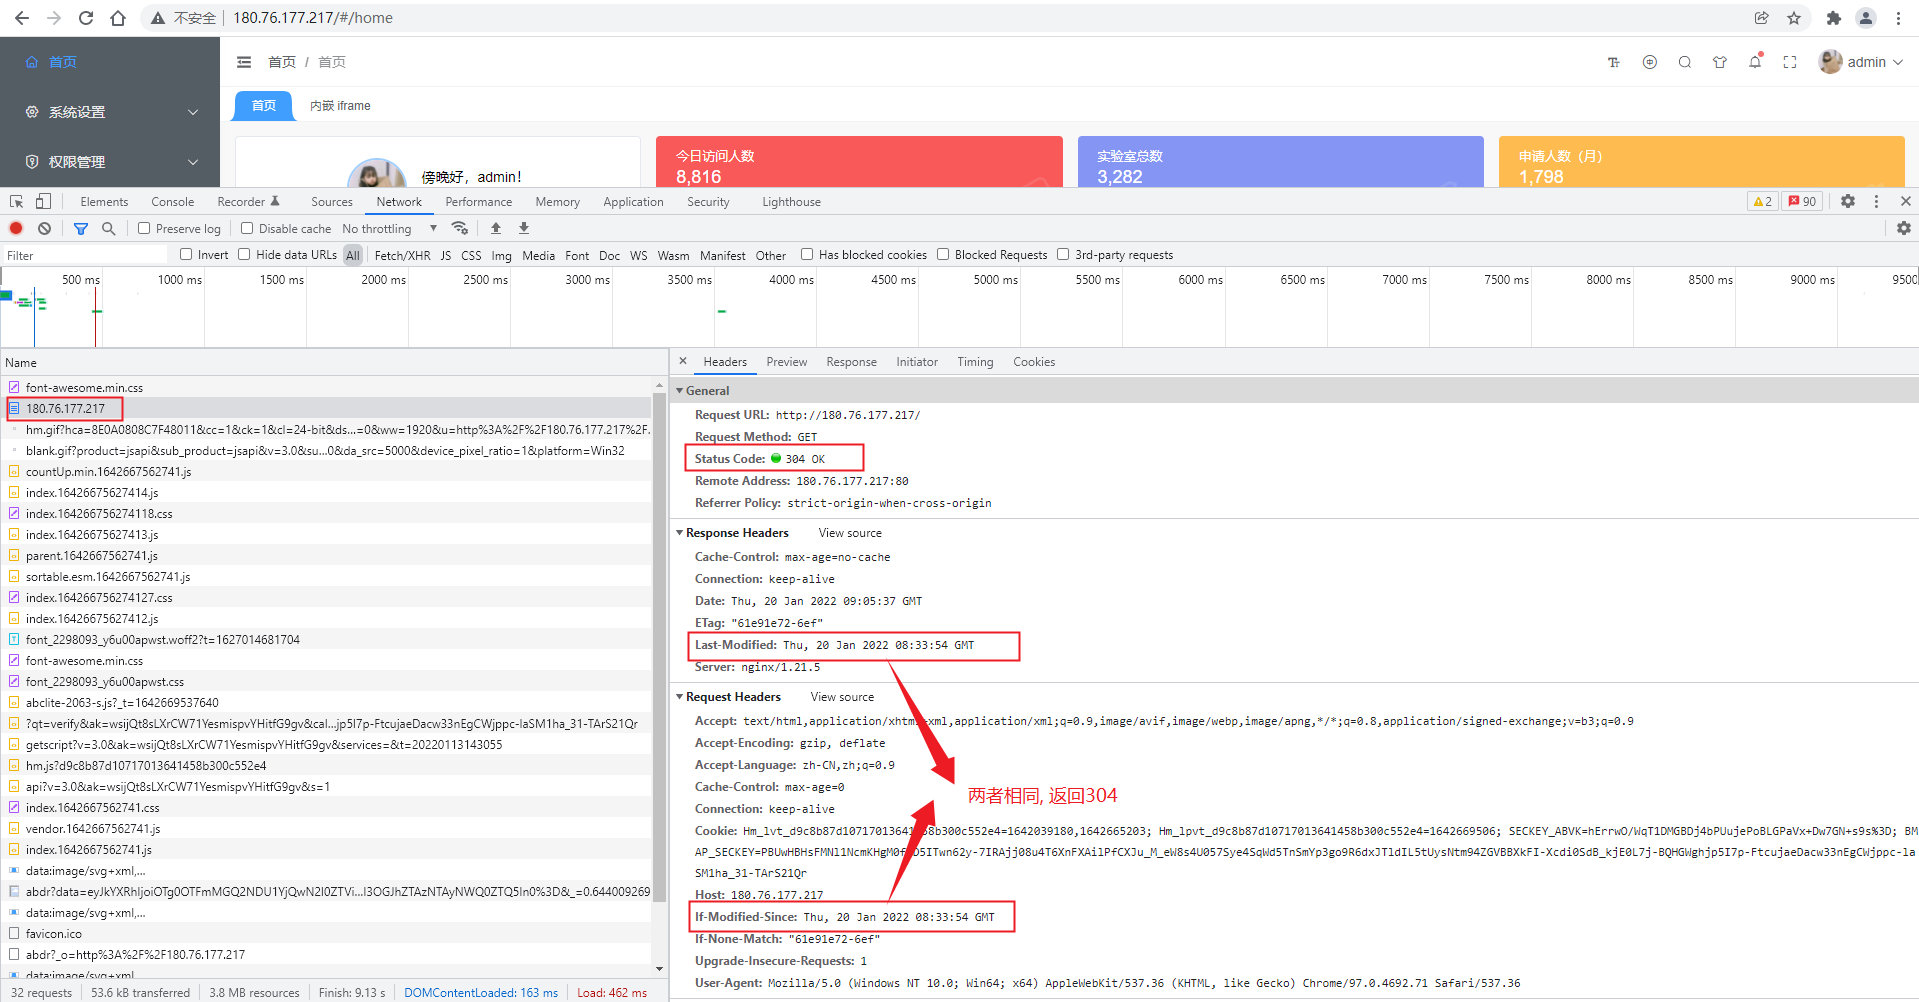
add_header Cache-Control max-age=360000; 的含义给上面匹配后缀的文件设置强制缓存,且缓存的时间是360000秒,第一次访问的时候,从服务器请求,当除了第一次以外,再次刷新浏览器,会从浏览器缓存读取,那么强制缓存一般是从内存里面先读取,如果内存没有,再从硬盘读取。如下图 
也可以 在location里面用expires来为规则匹配上的url设置缓存,expires可选的值如下: ● off 让 Expires 和 Cache-Control 头部不能被更改。 ● epoch 将Expires 头部设置成 1970 年 1 月 1 日 00:00:01。 ● max 设置 Expires 头部为 2037 年 12 月 31 日 23:59:59,设置 Cache-Control 的最大存活时间为 10 年 ● 没有 @ 前缀的时间意味着这是一个与浏览器访问时间有关的过期时间。可以指定一个负值的时间,就会把 Cache-Control 头部设置成 no-cache。例如:expires 10d 或者expires 14w3d。 ● 有 @ 前缀的时间指定在一天中的某个时间过期,格式是 Hh 或者 Hh:Mm,H 的范围是 0 到 24,M 的范围是 0 到 59,例如:expires @15:34。
可以用以下的时间单位: ● "ms": 毫秒 ● "s": 秒 ● "m": 分钟 ● "h": 小时 ● "d": 天 ● "w": 星期 ● "M": 月 (30 天) ● "y": 年 (365 天) 例如:"1h30m" 表示一小时三十分钟,"1y6M" 表示一年六个月。
注意,要是你用一个在将来很久才会过期的头部,当组件修改时你就要改变组件的文件名。因此,给文件名上加hash值是一个好办法。例如,webpack在打包时候,可以配置根据文件内容在文件名上加上contentHash,例如: chunk_adc.erfbdsaafhieuwr.js,这样浏览器加载文件的时候文件名都变了肯定会重新请求服务器,如果你没有更改文件名,浏览器将从缓存里面加载(旧的)文件。
除了把基于浏览器访问时间设置 Expires 头部(比如 expires 10d)之外,也可以通过在时间前面的modified关键字,将 Expires头部的基准设为文件修改的时间(请注意这仅仅对存储在硬盘的实际文件有效)。
bash
expires modified 10d;3. 反向代理缓存配置
注意:如上只是不对反向代理的页面进行缓存设置的,但是如果是反向代理后的页面,如上设置是不生效的。比如说我node起了一个服务,然后通过访问nginx反向代理的方式代理到我node服务来,上面的配置是不生效的。因此我们需要如下处理配置。
比如我的node服务端口是7878端口。nginx需要如下配置:
bash
server {
  listen  8081;
  server_name  xxx.abc.com;
  location / {
    proxy_pass http://localhost:7878;
    add_header  Cache-Control  max-age=0, no-cache;
  }
}- 如果我们要添加缓存功能的话,需要创建一个用于存放缓存文件的文件夹。
注意:由于nginx是docker部署的,所以这个缓存的目录创建需要遵循容器与宿主机映射目录的位置。 当时创建容器命令:docker run -idt -p 80:80 -p 443:443 --name nginx-vue -v /home/www/nginx/conf/nginx.conf:/etc/nginx/nginx.conf -v /home/www/nginx/html:/usr/share/nginx/html -v /home/www/nginx/logs:/var/log/nginx -v /home/www/nginx/conf/conf.d:/etc/nginx/conf.d nginx:latest
需要进入容器创建目录
bash
docker exex -it <ID> bash

mkdir -p /data/nuget-cache

exit
2)然后我们需要在nginx.conf的http设置部分添加 proxy_cache_path的设置,如下:
bash
vim /home/www/nginx/conf/nginx.conf # 宿主机映射容器内的配置文件(目录位置是创建容器时候自定义的)在http里面,server外面,添加如下配置
bash
proxy_cache_path /data/nuget-cache levels=1:2 keys_zone=nuget-cache:20m max_size=50g inactive=168h;proxy_cache_path 各个配置值的含义解析如下:
proxy_cache_path指缓存的目录地址,目录为:/data/nuget-cache。levels=1:2指定该缓存空间对应的目录,最多可以设置3层,每层取值为1|2,例如:1:2、 1:2:1等- 举例说明:
- itheima[key]通过MD5加密以后的值为 43c8233266edce38c2c9af0694e2107d
- levels=1:2 最终的存储路径为/usr/local/proxy_cache/d/07
- levels=2:1:2 最终的存储路径为/usr/local/proxy_cache/7d/0/21
- levels=2:2:2 最终的存储路径为??/usr/local/proxy_cache/7d/10/e2
- 举例说明:
keys_zone指的是缓存空间名称,这里叫nuget-cache。这里缓存内存的空间为20M。1M大概能存储8000个keysmax_size设置最大缓存空间,如果缓存空间存满,默认会覆盖缓存时间最长的资源。这里为50G.inactive=168h指定缓存的数据多次时间未被访问就将被删除,在这里为168个小时,即7天,也可以写成:inactive=7d; 这样的。
3)还需要在server设置部分添加 proxy_cache 与 proxy_cache_valid的设置:如下代码:
bash
server {
    listen  8081;
    server_name  xxx.abc.com;
    location / {
      proxy_pass http://localhost:7878;
      add_header  Cache-Control  max-age=0, no-cache;
      proxy_cache nuget-cache;
      proxy_cache_valid 1h; # 仅仅指定了time,那么只有状态码为200、300和302的响应会被缓存。其余不缓存;
    }
  }
proxy_cache 设置的是 proxy_cache_path中的keys_zone的值。这里为nuget-cache proxy_cache_valid:对不同返回状态码的URL设置不同的缓存时间,详细见下文
还需要再server中加入如下配置:
bash
proxy_ignore_headers Set-Cookie Cache-Control;
proxy_hide_header Cache-Control;
proxy_hide_header Set-Cookie;proxy_ignore_headers的含义是:忽略Cache-Control的请求头控制,依然进行缓存,比如对请求头设置cookie后,默认是不缓存的,需要我们增加忽略配置。
一些缓存指令
- proxy_cache:
该指令用来开启或关闭代理缓存,如果是开启则自定使用哪个缓存区来进行缓存。
语法 proxy_cache zone_name|off; 默认值 off; 位置 http、server、location
zone_name 代表指定使用缓存区的名称
- proxy_cache_key
该指令用来设置web缓存的key值,Nginx会根据key值MD5哈希存缓存。
语法 proxy_cache_key key; 默认值 $scheme$proxy_host$request_uri; 位置 http、server、location
- proxy_cache_valid
该指令用来对不同返回状态码的URL设置不同的缓存时间
语法 proxy_cache_valid [code ...] time;; 默认值 - 位置 http、server、location
如:
bash
# 为200和302的响应URL设置10分钟缓存,为404的响应URL设置1分钟缓存
proxy_cache_valid 200 302 10m;
proxy_cache_valid 404 1m;

# 如果仅仅指定了time,那么只有状态码为200、300和302的响应会被缓存。其余不缓存;
proxy_cache_valid  5m;

# 对所有响应状态码的URL都设置1分钟缓存
proxy_cache_valid any 1m;- proxy_cache_min_uses
该指令用来设置资源被访问多少次后被缓存
语法 proxy_cache_min_uses number;; 默认值 1 位置 http、server、location
- proxy_cache_methods
该指令用户设置缓存哪些HTTP方法
语法 proxy_cache_methods GET|HEAD|POST;; 默认值 GET HEAD 位置 http、server、location
默认缓存HTTP的GET和HEAD方法,不缓存POST方法。
4. 反向代理配置缓存配置文件示例
bash
http {
  // ..... 其他的配置
  proxy_cache_path  /data/nuget-cache levels=1:2 keys_zone=nuget-cache:20m max_size=50g inactive=168h;
  server {
    listen  8081;
    server_name  xxx.abc.com;
    location / {
      proxy_pass http://localhost:7878;
      add_header  Cache-Control  max-age=0, no-cache;
      proxy_cache nuget-cache;
      proxy_cache_valid 1h;
      proxy_ignore_headers Set-Cookie Cache-Control;
      proxy_hide_header Cache-Control;
      proxy_hide_header Set-Cookie;
    }
  }
}
所以,共加入的配置有 http下配置: proxy_cache_path /data/nuget-cache levels=1:2 keys_zone=nuget-cache:20m max_size=50g inactive=168h; server -> location 下配置: add_header Cache-Control max-age=0, no-cache; proxy_cache nuget-cache; proxy_cache_valid 1h; proxy_ignore_headers Set-Cookie Cache-Control; proxy_hide_header Cache-Control; proxy_hide_header Set-Cookie;
5. Nginx缓存参考文章
nginx缓存配置及开启gzip压缩如何使用浏览器缓存和Nginx,提升首屏访问速度看完这篇还不清楚缓存,求你打我😈(有彩蛋)